
No products in the cart.
Build a Meshtastic Node the Easy Way!
Meshtastic is rapidly gaining popularity across Europe, with new nodes being set up daily. These nodes connect using the license-free 868 MHz frequency, forming a mesh network with LoRa radios. This setup is ideal for off-grid adventures or emergency preparedness.
In this guide, we show you how easy it is setting up Meshtastic node using the HELTEC WiFi LoRa 32(V3) and the Bender case, leveraging the web-based Meshtastic Flasher to simplify the firmware installation process.
What You’ll Need
- HELTEC WiFi LoRa 32(V3): A microcontroller featuring built-in LoRa communication and an OLED display.
- Bender Case: An enclosure designed to house and protect your HELTEC device, including a battery holder, power management, and antenna ports.
- 18650 LiPo Battery: A 3.7V lithium polymer battery to power your device. A battery is optional but recommended to make the node truly off-grid.
- Antenna: A radio is only as good as its antenna, choose a high quality gain antenna to optimise your nodes coverage.
- USB Cable: For connecting your HELTEC board to a computer.
Step 1: Flashing the Meshtastic Firmware
The easiest way to get started with Meshtastic is by using the Meshtastic Web Flasher. This tool allows you to flash the firmware directly from your browser without needing to install the Arduino IDE or other software.
- Prepare Your HELTEC Board:
– Make sure your HELTEC WiFi LoRa 32(V3) board is disconnected from any power sources.
– Connect the board to your computer using a USB cable. - Access the Meshtastic Web Flasher:
– Open your preferred web browser and go to the Meshtastic Web Flasher
– The Web Flasher page will guide you through the flashing process. - Select Your Device
– On the Web Flasher page, click on “Connect.” Your browser may prompt you to select the device to connect to. Choose the HELTEC WiFi LoRa 32(V3) from the list and click “Connect.” - Flash the Firmware:
– The Web Flasher will automatically detect the appropriate firmware version for your HELTEC board. Click “Flash” to start the process. This will upload the latest Meshtastic firmware to your device.
– Wait for the process to complete. The firmware flashing typically takes a few minutes. Once done, you’ll see a success message. - Verify the Flashing:
– After flashing, the device should automatically restart. The OLED display on the HELTEC board will show Meshtastic information, confirming that the firmware was installed correctly.
Step 2: Configuring Your Meshtastic Device
With the firmware successfully flashed, you can now set up and configure your device using the Meshtastic mobile app.
- Install the Meshtastic App on your iOS or Android device:
– Download the Meshtastic app from the Google Play Store (for Android) or TestFlight (for iOS). - Pair Your Device:
– Turn on the HELTEC WiFi LoRa 32(V3) if it isn’t already powered on. Open the Meshtastic app and follow the prompts to pair your device via Bluetooth. The app will automatically detect the device. - Configure Device Settings:
– In the app, you can configure various settings such as device name, region, and channel settings. You can also manage other nodes in your mesh network and customize communication parameters.
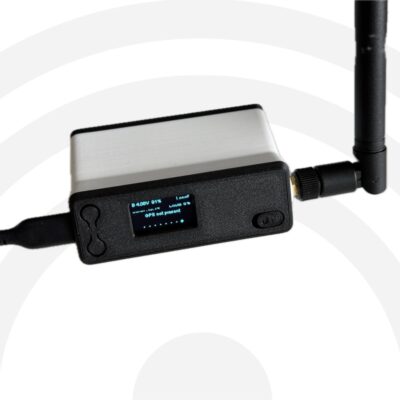
Step 3: Install the Node in the Bender Case
The Bender case is designed to house your HELTEC device, providing both protection and portability.
- Install the HELTEC Board:
– Place your HELTEC WiFi LoRa 32(V3) board inside the front of the Bender case.
– Install the battery holder from the rear and thread the cables towards the front panel,
– Secure the power switch to the front panel and connect the battery connector to the HELTEC board.
– Install the antenna port on the side.
– See the instruction video on the Bender Case product page for a how-to guide. - Attach the Antenna:
– Connect the antenna to the antenna port on the Bender Case. This step is crucial for ensuring long-range communication. - Insert the Battery:
– Place the 18650 LiPo battery inside the battery holder within the Bender case. - Secure the Bender Case:
– Close and secure the Bender Case, the different pieces snaps into place. Your device is now ready for use!
Step 4: Testing and Expanding Your Meshtastic Node
Now that your HELTEC device is set up and housed in the Bender Case, it’s time to test your Meshtastic node.
- Setup Your Device:
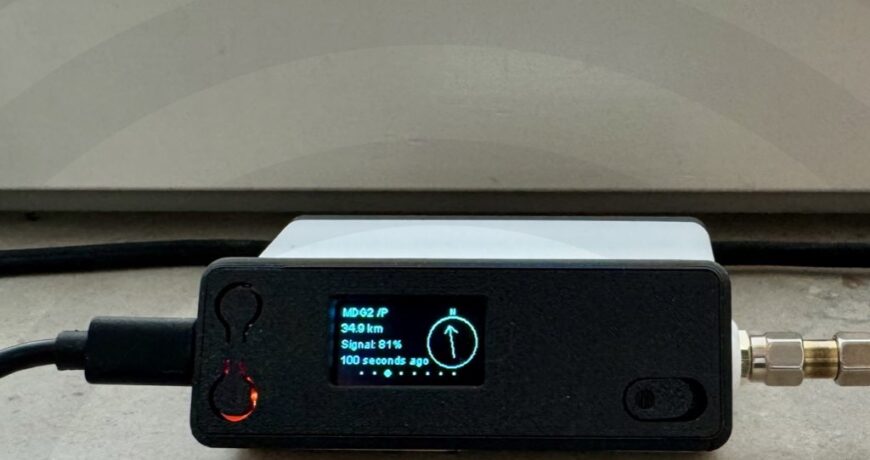
– Turn on your device using the power switch on the Bender case. The HELTEC WiFi LoRa 32(V3) should display boot information on the OLED screen, indicating it’s ready for operation.
– Install and open the Meshtastic app on your iOS or Android device. - – In the iOS/Android app, click on “Settings” on the lower menu. Here you need to chose the proper Region, for EU it is “European Union 868 MHz”.
– Open “User” and set a long and short name for your node. Make the short name something unique like the suffix in your ham call, the field is limited to four characters. The long name can contain more information like your area or other identifier. - Explore the Node List
– Now click “Nodes” in the lower menu. Any nearby nodes should soon become visible in the list. If you don’t see nodes populating immediately, be patient and leave your node running as most nodes announce their presence only a few times per hour or less. If no nodes become visible, test by moving your node to a high and clear position. - Send and Receive Messages:
– Once other nodes are visible on the node list, you are “in the mesh” and ready to communicate. Use the Meshtastic app to send and receive messages. Test the range by moving the device to different locations, observing the signal strength and message delivery. Experiment and have fun! - Expand Your Network:
– To increase the coverage and reliability of your mesh network, consider adding more HELTEC boards or other compatible devices. These additional nodes will help extend the communication range and enhance network robustness. For example, keeping one node on your roof or in your tower, and another portable node in your pocket will make sure you are always connected with maximum possible range leveraging the power mesh networking.
Products to Build A Meshtastic Node
-
-
Meshtastic, zerofox3D
Bender Case for HeltecV3
Designed by zerofox3D, Bender is the wildly popular case for the Heltec V3 LoRA Meshtastic powered Radio node. It features a bay for an 18650 battery and support for a full size SMA connector so a variety of antenna’s can be used. Just add your own HeltecV3 and you have a Meshtastic node!
SKU: BEND -
Heltec Automation, Meshtastic
HELTEC WiFi LoRa 32(V3) 863-928 MHz
HELTEC WiFi LoRa 32 is one of the most popular devices for deploying Meshtastic nodes, control and security applications, wireless meter reading, IoT developers etc. This is the 863~928 MHz version for EU868 and other regions within this frequency range.
For a complete node, add a Bender Case for Heltec V3.
SKU: HT23V3 -
Heltec Automation, Meshtastic
HELTEC WiFi LoRa 32(V3) 433-510 MHz
Build a reliable Meshtastic node with the Heltec WiFi LoRa 32 V3 – a compact board featuring the ESP32, SX1262 LoRa module, and integrated OLED display. Perfect for setting up low-power, long-range mesh network without cellular or internet access.
To build a complete node, add a Bender Case for Heltec V3 (includes all wiring, battery holder and antenna connector).
SKU: HTV3-433 -
LoRa 868 MHz Antennas, Meshtastic, Paradar Antennas
Paradar 868 Mhz Tuned Whip Antenna 5 dBi
Paradar 5dBi indoor whip antennas are an enhanced tuned dipole design from brass tube, producing an extremely efficient response at the chosen frequency. This Paradar antenna is more efficient and achieves longer range than cheaper antennas though they might look the same!
SKU: PAR45-1


Conclusion
By using the Meshtastic Web Flasher and the HELTEC WiFi LoRa 32(V3) in combination with the Bender case, you’ve set up a powerful, portable communication tool that works even in areas without internet and cellular coverage. Whether you’re exploring remote areas, preparing for emergencies, or simply experimenting with mesh networks, Meshtastic provides a flexible and scalable solution.
Be sure to explore our Meshtastic Department for more products!